This is default featured post 1 title

Go to Blogger edit html and find these sentences.Now replace these sentences with your own descriptions.This theme is Bloggerized by Lasantha Bandara - Premiumbloggertemplates.com.

This is default featured post 2 title

Go to Blogger edit html and find these sentences.Now replace these sentences with your own descriptions.This theme is Bloggerized by Lasantha Bandara - Premiumbloggertemplates.com.

This is default featured post 3 title

Go to Blogger edit html and find these sentences.Now replace these sentences with your own descriptions.This theme is Bloggerized by Lasantha Bandara - Premiumbloggertemplates.com.

This is default featured post 4 title

Go to Blogger edit html and find these sentences.Now replace these sentences with your own descriptions.This theme is Bloggerized by Lasantha Bandara - Premiumbloggertemplates.com.

This is default featured post 5 title

Go to Blogger edit html and find these sentences.Now replace these sentences with your own descriptions.This theme is Bloggerized by Lasantha Bandara - Premiumbloggertemplates.com.

Showing posts with label Widgets Tunes. Show all posts

8/28/2011

Blog Widgets, Recent Comments and Recent Posts Widgets

Recent Comments Widget

Adding a Recent Comments widget into your sidebar is a way of acknowledging the readers' feedback and giving their comments a prominent place in the main page of your Blog. It also makes it easier for them to check for replies to their questions and for other readers to follow up on topics which they may find interesting. This widget is especially useful if you have numerous comments to your Blog posts. As part of our writeup, we shall also explain how you can remove the “nofollow” tag in the Comments section of the template so as to allow the links in these comments to be visited by search engine spiders.

While we can use JavaScripts to call for the comments, we would rather not do so because the widget will not be displayed in many browsers that disable the running of JavaScripts. We shall therefore suggest using the feed widget method to display these recent comments.

Update: For those who want to use the JavaScript method, refer to our article Recent Comments Feed Widget.

First, we have to ensure that Comment Feeds are enabled. Once you are logged in, go to Settings -> Site Feed and switch to “Advanced Mode”. You should set the “Blog Comment Feed” and “Per-Post Comment Feeds” to either “Short” or “Full”. Do not choose “None”. Save the Settings.

Recent Comments and Recent Posts Widgets

Go back to Template -> Page Elements -> Add a Page Element in your sidebar and select “Feed”. You will be prompted to enter a Feed URL. The Feed URL we entered is this:-
http://tips-for-new-bloggers.blogspot.com/feeds/comments/default


This is the Atom Feed for the Blog comments. You can alternatively insert the RSS Feed for Blog Comments as follows:-

http://tips-for-new-bloggers.blogspot.com/feeds/comments/default?alt=rss


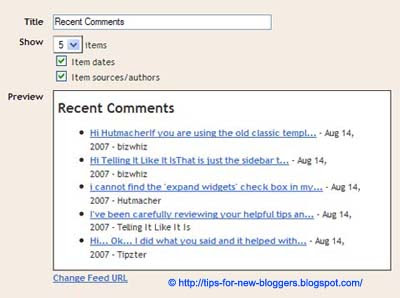
Change the portion (in red) to the URL of your own blog. Once you have entered that, this is what you see on the screen.
Recent Comments and Recent Posts Widgets

Insert a Title. The maximum number of links shown in a feed widget is 5. This is a limitation in using this method. But we think it is acceptable and having too many recent comment links may clutter the sidebar. You can decide whether or not to display the dates and name of the authors. When you are satisfied with the setting, click to Save the Changes. Drag and drop the widget to the relevant part of the template and Save the Template.

Nofollow attribute in Comments

If you have had your blog up and running for a while, you may have come across comment postings in your Blog which are plain advertisements of their own blogs. They usually include hyperlinks to their Blogs so as to raise the profile of their sites in search engines. While there is technically nothing wrong with that, your readers may be annoyed to have to sieve through a list of “irrelevant” comments just to seek an answer to a point in the posts. Many Bloggers detested such practise and labeled this act as “comment spam”. Google did not like it either, and introduced a standard “nofollow” tag to all Blogger.com blog comments. It literally tells the Google search spider to ignore all the hyperlinks in the comments. Hopefully, this will deter the spammers who now receive no search engine ranking benefits by putting their Blog links in the comments.

As a Blog owner, you can decide whether you want to remove this attribute. The advantage of removing it is that you will encourage more readers to post comments since the search engines will crawl their sites if they post their Blog links in the comments. The disadvantage is that you may have to deal with constant abuses of this system.

If you want to remove the “nofollow” tag in the Blog comments to allow search engines to crawl the comment author's links, go to Template -> Edit HTML and check the “Expand Widget Templates” box.

Scroll to these lines (you can search using Ctrl-F in most browsers) and remove the parts (shown in red):-

<dl id='comments-block'>
<b:loop values='data:post.comments' var='comment'>
<dt class='comment-author' expr:id='"comment-" + data:comment.id'>
<a expr:name='"comment-" + data:comment.id'/>
<b:if cond='data:comment.authorUrl'>
<a expr:href='data:comment.authorUrl' rel='nofollow'><data:comment.author/></a>
<b:else/>


And

<dl class='comments-block' id='comments-block'>
<b:loop values='data:post.backlinks' var='backlink'>
<div class='collapsed-backlink backlink-control'>
<dt class='comment-title'>
<span class='backlink-toggle-zippy'>&#160;</span>
<a expr:href='data:backlink.url' rel='nofollow'><data:backlink.title/></a>


Save the template.

Recent Posts Widget

One way to let readers locate the recent posts is to have an “Archive” page element in the sidebar. It sorts the articles by dates. However, it is not ideal for those who do not have active Blogs or any new post in the last couple of months. These people may want to display the links to recent posts, regardless of the dates. Even if you have an active Blog, regular visitors may want to view your recent posts only, and a link widget showcasing these recent post links would be appreciated.

Again, the Feed widget method seems to be by far the easiest to adopt. Just like before, go to Settings -> Site Feed and switch to “Advanced Mode”. This time, see that “Blog Posts Feed” is set to either “Short” or “Full”. Do not choose “None”. If you have an external feed address through Feedburner, Feedblitz or any other service, you can enter that Feed URL so that all feeds will be redirected to that address. Save the Settings.

Recent Comments and Recent Posts Widgets

To insert the Recent Posts widget, go back to Template -> Page Elements -> Add a Page Element in the sidebar and select “Feed”. You will be prompted to enter a Feed URL. If you do not have an external Feed address, the URL to enter is this:-

http://tips-for-new-bloggers.blogspot.com/feeds/posts/default


This is the Atom Feed URL of your Blog Posts. Instead of the Atom Feed, you can insert the RSS Feed URL as follows:-

http://tips-for-new-bloggers.blogspot.com/feeds/posts/default?alt=rss


In our case, for example, we have an external feed address at Feedburner and instead of the above address, we keyed in:-

http://feeds.feedburner.com/TipsForNewBloggers


Change the portion (in red) to the URL of your own blog. Once you have entered the Post feed address, you can change the variables such as Title, number of links to display, dates and author names.
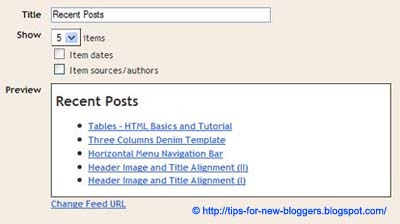
Recent Comments and Recent Posts Widgets

Save the changes. Move the element to the preferred part of the template and Save Template.

Customize the Widgets

To differentiate the Recent Comments or the Recent Posts widgets so that they do not appear to be ordinary link widgets, add some dynamic effects to these links. We gave some examples of the various styles in our article on Links - Hover and Rollover Effects.

After creating your widget, go to Template -> Edit HTML and scroll to somewhere near the bottom. You will see something like this:-

<b:widget id='Feed1' locked='false' title='Recent Comments' type='Feed'/>


The ID Feed1 is what we need to know. As you create more feed widgets, there will be more IDs like Feed2, Feed3, etc. We can create style definitions for each of these widgets.

Back at the top of the template, you see a list of links and hover styles like this:-

a:link {
color:$linkcolor;
text-decoration:none;
}
a:visited {
color:$visitedlinkcolor;
text-decoration:none;
}
a:hover {
color:$titlecolor;
text-decoration:underline;
}


We can insert after that another set of rules for the Feed1 widget. For example, we can insert this:-

#Feed1 {
background: #ffff66;
}

#Feed1 a:link {
color:#4CC552;
}

#Feed1 a:visited {
color:#6D7B8D;
}

#Feed1 a:hover {
color:#F88017;
background: #E3E4FA;
}


Our widget will have a background color yellow (#ffff66). The links are green in color (#4CC552). Visited links turn grey in color (#6D7B8D). When the mouse hovers over the Recent Comments link, it appears orange (#F88017) with a lavendar backdrop (#E3E4FA). Try different combinations and styles by inserting various color codes from our Color Code Chart. Always “Preview” the template to view the changes. Save the template only when you are happy with the outcome.

Further reading:-

Check out more widget ideas that you can add to your sidebar in our Blog Widgets, Gadgets and Add-ons guide.

© www.RiOtunes.blogspot.com

Blog Widgets, Language Translation Flags and Script

This tutorial explains how you can add a script to allow readers to view your English site in other foreign languages. As you can see on the right of this page, a reader needs only to click the relevant country flag to read this site contents in his preferred language.

English is not the most popular language in the world. In fact, according to many reports, the Chinese language (Mandarin) is certainly the most widely spoken language. In the internet community, the other popular language platforms are arguably Spanish, Russian, Arabic, Portuguese, Malay, Italian, French, Japanese, and Korean.

Translation from English to other languages

If you have a blog written in English, it therefore makes much sense to be able to reach out to the non-English speaking population as well. There are several online translation tools, the popular free tools being AltaVista's Babel Fish translation and Google's Language Translator. WorldLingo is no longer a recommended tool, as the website translator has a translation limit of 500 words, beyond which you have to pay a monthly fee for their service.

For this site, I have used the Google Language Translator. Google is able to translate English website contents into Arabic, Chinese, French, German, Italian, Japanese, Korean, Portuguese, Russian, and Spanish. The JavaScript used here can be applied to most of the blogging sites like Blogspot, Typepad and Wordpress. Copy the following script and paste it at the part of the template where you want your language translator to appear.
<form action="http://www.google.com/translate" >


<script language="javascript" type="text/javascript">


<!--


document.write ("<input name=u value="+location.href+" type=hidden>")


// -->


</script>


<noscript><input name="u" value="http://tips-for-new-bloggers.blogspot.com/" type="hidden" /></noscript>


<input name="hl" value="en" type="hidden">


<input name="ie" value="UTF8" type="hidden">


<input name="langpair" value="" type="hidden">


<input name="langpair" value="en|ar" title="Arabic" src="http://photos1.blogger.com/x/blogger2/6075/564571464515337/1600/z/358406/gse_multipart12399.png" height="20" type="image" width="30" onclick="this.form.langpair.value=this.value">


<input name="langpair" value="en|zh-CN" title="&#20013;文(简体)/Chinese (Simplified)" src="http://photos1.blogger.com/x/blogger2/6075/564571464515337/1600/z/546049/gse_multipart12397.png" height="20" type="image" width="30" onclick="this.form.langpair.value=this.value">


<input name="langpair" value="en|zh-TW" title="&#20013;文(繁体)/Chinese (Traditional)" src="http://photos1.blogger.com/x/blogger2/6075/564571464515337/1600/z/208681/gse_multipart12398.png" height="20" type="image" width="30" onclick="this.form.langpair.value=this.value">


<input name="langpair" value="en|fr" title="Fran&#231;ais/French" src="http://photos1.blogger.com/x/blogger2/6075/564571464515337/1600/z/327620/gse_multipart12413.png" height="20" type="image" width="30" onclick="this.form.langpair.value=this.value">


<input name="langpair" value="en|de" title="Deutsch/German" src="http://photos1.blogger.com/x/blogger2/6075/564571464515337/1600/z/734899/gse_multipart12400.png" height="20" type="image" width="30" onclick="this.form.langpair.value=this.value">


<input name="langpair" value="en|it" title="Italiano/Italian" src="http://photos1.blogger.com/x/blogger2/6075/564571464515337/1600/z/306145/gse_multipart12401.png" height="20" type="image" width="30" onclick="this.form.langpair.value=this.value">


<input name="langpair" value="en|ja" title="&#26085;本語/Japanese" src="http://photos1.blogger.com/x/blogger2/6075/564571464515337/1600/z/443122/gse_multipart12402.png" height="20" type="image" width="30" onclick="this.form.langpair.value=this.value">


<input name="langpair" value="en|ko" title="&#54620;국어/Korean" src="http://photos1.blogger.com/x/blogger2/6075/564571464515337/1600/z/581031/gse_multipart12403.png" height="20" type="image" width="30" onclick="this.form.langpair.value=this.value">


<input name="langpair" value="en|pt" title="Portugu&#234;s/Portuguese" src="http://photos1.blogger.com/x/blogger2/6075/564571464515337/1600/z/670301/gse_multipart12404.png" height="20" type="image" width="30" onclick="this.form.langpair.value=this.value">


<input name="langpair" value="en|ru" title="&#1056;усский/Russian" src="http://photos1.blogger.com/x/blogger2/6075/564571464515337/1600/z/111692/gse_multipart12405.png" height="20" type="image" width="30" onclick="this.form.langpair.value=this.value">


<input name="langpair" value="en|es" title="Espa&#241;ol/Spanish" src= "http://photos1.blogger.com/x/blogger2/6075/564571464515337/1600/z/998398/gse_multipart12407.png" height="20" type="image" width="30" onclick="this.form.langpair.value=this.value">


</form>


Points to note:-

1. For those using Blogspot, once you have logged into your Dashboard, go to Template-> Page Elements. Add a “Page Element” and select “HTML/JavaScript”.

2. Copy the above JavaScript. Under the “value” (in red), you will see the URL of this website. Please change that to the URL of your own website. Save and refresh the page.

3. If you want a slightly bigger flag, you can increase the width of the images, for example, from “30” to “36” and the height from “20” to “24”.

4. Should you come across a translation that doesn't look right, you can always suggest to Google a better translation to help them improve their translation quality.

Translation from other languages to English

If you have a site written in another language, you can also have a translation tool on your Blog to translate it into English. At the moment, Google is able to translate Arabic, Chinese, French, German, Italian, Japanese, Korean, Portuguese, Russian, and Spanish sites into English.

Go to the official Google Language Tools site. Key in your Blog URL at the place circled in the picture below. Choose the languages e.g., “Italian to English”.

Language Translation Flags and Script

Once you click “Translate”, you will be taken to the translated page. Copy the translated page URL in the browser. We have to insert this URL into the HTML code.

Language Translation Flags and Script

Next, login to your Dashboard, under Template -> Page Elements -> Add a Page Element, choose HTML/JavaScript at the place where you want to put your translation flag.

If you want a United Kingdom flag, copy and paste this code into the page element.

<a href="translated page URL" title="English"><img border="0" alt="Google Translation" src="http://photos1.blogger.com/x/blogger2/6075/564571464515337/1600/z/212122/gse_multipart16503.png"/></a>


If you want a United States of America flag, use this code instead.

<a href="translated page URL" title="English"><img border="0" alt="Google Translation" src="http://photos1.blogger.com/x/blogger2/6075/564571464515337/1600/z/724501/gse_multipart16505.png"/></a>


Please remember to insert the translated page URL into the code. If you wish to resize the picture by specifying the width and height, or if you want to have readers go to a new window when they click the link, you may read the article on Hyperlinks and Image Links (II) to see how you can do that.

Save and refresh your Blog to see the translation flag.


Blog Widgets, JavaScript for Quote of the Day

If you are wondering whether I manually add a Quote of the Day, the answer is no. I have used a simple JavaScript to display a new Quote everyday. There are a few JavaScript codes written by several people - some make you pay to buy their program, while others allow you to tap on to their Quotes database. I was looking for something simple, and unfortunately a number of those I found online do not work.

In the end, I looked up books and came up with a simple JavaScript which stores quotes and authors in a format called “arrays”. I keyed in 31 quotes and the script will display a new quote every day of the month.

If you would like to add one, go to Template ->Page Elements and click “Add a Page Element” to the place you want your Quote of the Day to appear. Add a "HTML/JavaScript".

The JavaScript I have used for the Quote of the Day you see in this site is as follows:-

Update: <noscript> tag added. Readers like us who have disabled JavaScript in our browsers will see a statement instead of a blank space.
<!-- http://tips-for-new-bloggers.blogspot.com/ -->

<table border="1" cellpadding="20" bordercolor="#ADD8E6">
<tr>
<td bgcolor="#E0FFFF">
<a href= "http://quotes-motivational-inspirational.blogspot.com/"> Quote of the Day</a>
<p></p>

<script language="javascript" type="text/javascript">

var d=new Date();

var quotes=new Array(31);

var authors=new Array(31);

quotes[0]="If a man watches three football games in a row, he should be declared legally dead.";

quotes[1]="Friendship is far more tragic than love. It lasts longer.";

quotes[2]="Advice is like castor oil, easy enough to give but dreadful uneasy to take.";

quotes[3]="";

quotes[4]="";

quotes[5]="";

quotes[6]="";

quotes[7]="";

quotes[8]="";

quotes[9]="";

quotes[10]="";

quotes[11]="";

quotes[12]="";

quotes[13]="";

quotes[14]="";

quotes[15]="";

quotes[16]="";

quotes[17]="";

quotes[18]="";

quotes[19]="";

quotes[20]="";

quotes[21]="";

quotes[22]="";

quotes[23]="";

quotes[24]="";

quotes[25]="";

quotes[26]="";

quotes[27]="";

quotes[28]="";

quotes[29]="";

quotes[30]="";

authors[0]="Erma Bombeck";

authors[1]="Oscar Wilde";

authors[2]="Josh Billings";

authors[3]="";

authors[4]="";

authors[5]="";

authors[6]="";

authors[7]="";

authors[8]="";

authors[9]="";

authors[10]="";

authors[11]="";

authors[12]="";

authors[13]="";

authors[14]="";

authors[15]="";

authors[16]="";

authors[17]="";

authors[18]="";

authors[19]="";

authors[20]="";

authors[21]="";

authors[22]="";

authors[23]="";

authors[24]="";

authors[25]="";

authors[26]="";

authors[27]="";

authors[28]="";

authors[29]="";

authors[30]="";

document.write(quotes[d.getDate()-1] + '<p style="text-align: right"><i>' + authors[d.getDate()-1] + '</i></p>');

</script>
<noscript>You need to enable JavaScript to read this.</noscript>
</td>
</tr>
</table>


Allow me to elaborate what the script does.

1. I have defined a table for the Quote of the Day to be displayed in. You can of course change the “bordercolor” and “bgcolor” (background color) to whatever suits you. For a complete list of color values, you may refer to the Color Chart.

2. If you do not want a table but just a line of the Quote, simply remove these elements from the above script:-

<table border="1" bordercolor="#ADD8E6" cellpadding="20" bgcolor="#E0FFFF">
<tr>
<td>

</td>
</tr>
</table>


3. The first element of the arrays are [0]. I have for the purpose of this example entered the first 3 Quotes together with the corresponding authors' names. You can enter your favorite Quotes to fill up the remaining arrays. I have used Quotes from this Famous Motivational and Inspirational Quotes site.

4. Towards the bottom you will see this script:-

document.write(quotes[d.getDate()-1] + '<p style="text-align: right"><i>' + authors[d.getDate()-1] + '</i></p>');


What it does is to call for the numerical date. For example, the date of this posting is 10th February. The script “quotes[d.getDate()-1]” will call for the number “10” and minus 1 from this number. The result is that the Quote displayed will be the one keyed in under “quotes[9]”. The reason for having to deduct 1 is because, as mentioned above, arrays must begin with [0]. Hence, if the date were the 1st February, deducting 1 will give you a value “0”, and the displayed quote will be the one that appears under “quotes[0]”.

Once you have saved the JavaScript, refresh your Blog page, and you should now have a Quote of the Day automatically displayed on your Web Page.

Important Note: When you key in the quotations or names, do not use characters like " or ; and do not press “Enter” within the quotation marks. These are special characters which are used by JavaScript.

Change Font type, size and color

Should you want to change the font face, size and color of the quotes, you can insert the <span style> tags. For those who are unfamiliar with these tags, what you can do is to create a new post under “Compose” mode. Enter a word, e.g., TEXT. Block the word and change the font size through the toolbar. All you want is the code, and you can therefore delete this draft post. Next, go to “Edit HTML” mode and you can see the span tags like this:-

<span style="color: rgb(255, 0, 0);">TEXT</span>


Insert these tags (highlighted in red) into the above JavaScript for Quote of the Day at these places:-

<span style="color: rgb(255, 0, 0);">
<script language="javascript" type="text/javascript">
|
|
|
</script>
</span>


If you want to change the font type or color, you can do the same. Type any word in the “Compose” mode, highlight it and change the type or color through the toolbar. Go to “Edit HTML”, copy the <span style> code and insert that into the place shown above.
                                               
www.RiOtunes.blogspot.com 

Blog Widgets, Customize and Modify Poll Widget

In this article, we shall suggest some modifications to the CSS template to change the appearance of the Poll widget to something eye-catching and attention-grabbing. For example, we can add background colors or images to the Polls widget and change the font and border colors. These should draw the attention of your readers to the Poll and put some buzz into the Blog.

In case you are not aware, Blogger recently introduced a Polls Page Element allowing you to add a Poll to your sidebar. You determine the question and answers, and readers cast their votes within the Poll period set by you. It sounds like a nice feature, except that the look of this Poll widget is plain and unexciting as it blends into the background of your sidebar. With a bit of effort, we can change all that.

Set up a Poll

To set up a Poll, go to Template -> Page Elements and Add a Page Element in your sidebar. Select “Poll”. Enter the Question and insert all the possible answers. Tick if you allow multiple answers and set a date for the Poll to end. When you refresh your Blog, this is the Poll widget you see.

Customize and Modify Poll Widget

It follows the sidebar styles and blends with the sidebar background color. It is plain and many readers may not even notice it there.

Add Border and Colors

Let us now add a border and background color to it. Go to Template -> Edit HTML, scroll to any early part of the CSS template and insert the following code (shown in red). For easy reference, let's put the code under /* Sidebar Content */
/* Sidebar Content */
#Poll1{
background:#FFFF00;
border:3px solid #736AFF;
width:150px;
padding:0 10px;
}


Note:

1. When a Poll is created, Blogger will assign an ID to the widget. If this is the only poll, it will be named Poll1. If there is another poll in the Blog, that second poll will be named Poll2 and you should change the reference accordingly.

2. We have given it a yellow background color (#FFFF00). Change it to any other color by inserting the relevant color code from our Color Code Chart.

3. By default, there is no frame border to the widget. To make it stand out, we added a border of 3px. You can reduce it to 1px if you want a narrow border. Also, the color of the border is blue (#736AFF) in this example.

4. If the Poll widget is placed in the sidebar, it takes up 100% of the sidebar width. To narrow it, we can insert a width setting.

5. The padding is to give a space of 10px to the left and right of the contents, so that the border does not come too close to the wordings.

After saving the above modification to the template, this is the new look of our Poll widget. Doesn't it catch your attention right away?

Customize and Modify Poll Widget

Change Title Font

If this is not enough, let us change the font of the Title to make it different from the other widgets in the sidebar. Where we inserted the earlier code, we add this other definition (shown in red) into the template:-

/* Sidebar Content */
#Poll1{
background:#FFFF00;
border:3px solid #736AFF;
width:150px;
padding:0 10px;
}

#Poll1 h2{
text-align:center;
font-size:140%;
color:#F87431;
font-family:arial;
font-weight:bold;
}


Note:

1. The text-align property shifts the Title to the center. If you are happy having the Title aligned to the left, remove this line.

2. You don't need a font-size that large. This is to show you how you can adjust the font-size if you want to.

3. Again, you can assign a different color code to the color of the text.

4. Under font-family, you can change the font face of the Poll Title. Usual font families in Blogger include – arial, courier new, georgia, lucida grande, times new roman, trebuchet ms, verdana.

5. We made the Title bold by adding a font-weight. If you want it in italic, you can add another line of code - font-style: italic; - before the sign }

With the above code, readers should clearly see the new Poll widget:-

Customize and Modify Poll Widget

Add Background Image

Instead of a background color, we can use an image as a backdrop to our Poll widget. First create an image and upload it onto a free server like Google Page Creator and Google Groups. You may also refer to our rather comprehensive list of free Image Hosts and File Hosting Services in the article on Manage Blogger Image Storage Space. Take note of the IMAGE URL.

Next, go to Template -> Edit HTML and insert the background image as follows:-

/* Sidebar Content */
#Poll1{
background:url(IMAGE URL);
border:3px solid #736AFF;
width:150px;
padding:0 10px;
}

#Poll1 h2{
text-align:center;
font-size:140%;
color:#F87431;
font-family:arial;
font-weight:bold;
}


The IMAGE URL is the address of the image uploaded onto the web server. There are more attributes you can add to adjust the image position or repeat it. If you need to know more, you can refer to our guide at Background Image for Blogger Template.

With a background image, the Poll widget can look truly outstanding and inviting like this:-

Customize and Modify Poll Widget

Finally, together with this article, we have created a new Poll to ask you what Blogger template you are using. Although we are using the Minima template, we have received many queries by users pertaining to their other templates. To reply to their queries, we have also created test blogs in other Blogger template formats. Some of our articles, such as the ones on Blog Title alignment and Three Columns Templates, are catered to different template users. If you could let us know what Blogger template you have, we could bear that in mind in our future articles and discuss the changes to be made in relation to these other templates. Have fun creating and designing your own Poll widget!

Blog Widgets, Chat Box, Shout Box and Google Talk

The chat box you see on the left sidebar is one of the many FREE interactive tools you can get for your blogs. Call them what you like – tagboard, message board, chat box, chatter box, message box, shout box – they have one thing in common i.e., promoting interaction by allowing your visitors to leave messages or chat with one another. While it is true that your visitors can leave comments on the individual posts, there may be occasions when they have something to say that does not relate to the posts. A chat box will come in handy.

There are quite a number of service providers but we shall comment on the few that we think you can consider trying out. You can search the web for more. The key factors that we looked out for are simple configuration, nice colors and design, guard against comment spam, and ease of use. You may see advertisements in the free plans, but they are usually not that obtrusive and you can probably live with that. These providers may offer paid services as well, with extra features or bigger storage space for your messages. Our advice is to start off with their free service and monitor the usage of your chat box before upgrading your basic plan.

Cbox

Chat Box, Shout Box and Google Talk

We used their chat box for this site primarily because they have the essential features we wanted and the design looks sleek. Sign up with them, and begin configuring your chat box. Under the “Cbox Options” tab, configure the Display, Date and Post Options. Note that under “Post Options”, there is an “Anti-spam” feature. Tick that. Click “Colors & Fonts” and select the colors that will blend well with your blog. Use the “Color Picker” option at the top right corner if you are not familiar with the HTML color code. When you are done, click the “Quick Setup” tab to get your HTML code.

Login to your Blogger Dashboard, go to Template-> Page Elements. Where your sidebar is, click “Add a Page Element” and select “HTML/JavaScript”. Copy the above HTML code, paste it, and save the widget.

If you should receive any spam post, go to “Messages”, ban the user and delete the message. Under “Blocked Users” you can change the duration of the ban.

Shoutmix

Chat Box, Shout Box, and Google Talk

Chat Box, Shout Box and Google Talk

Here, your chat box is called a shoutbox. Once you have entered your bare particulars, choose one of their standard shoutbox styles, and your account is created. Go to the “Style” category. Shoutmix is interesting in that you can tweak the “Labels” in addition to the “Appearance”. Configure the settings under “General”. When you are ready, click the “Use Shoutbox” tab. You can now alter the width and height of your shoutbox and “Generate” the HTML code.

If you have a family-oriented blog, you may turn on the “Profanity Filter” by specifying a list of words that will not be shown in the shoutbox. You can also ban specific users or sites through their “Ban Control” option.

Oggix

Chat Box, Shout Box and Google Talk

A number of blogs have this shoutbox. Other than unlimited messages, you can find a wide range of custom tools and features. For a period of time, their code could not work on the new Blogger platform. That should have been fixed by now. Feel free to use their demo shoutbox and enter test messages before registering with them.

Tag-World

Chat Box, Shout Box and Google Talk

Some features like profanity filter are not available on their free plans. Otherwise, they have the usual customizable layouts, IP blocking, and anti-spam controls that you can find in the earlier sites. A simple tagboard that you can use for your blog.

Google Talk

Chat Box, Shout Box and Google Talk

If the visitors to your blog are family members and friends, get them to register free accounts with Google. You may then add a Google Talk gadget to your blog. Click “Add to your webpage” to configure the size of your widget and generate the HTML code. Your visitors can now chat away on your blog.

Plugoo

Chat Box, Shout Box, and Google Talk

There is this rather different and interesting service which you can check out. Imagine that you are in office, or do not want to be glued to your blog all the time. Should your blog visitor post a message on your chat box, you may not know about it until you have a chance to look at your blog. Plugoo has therefore created a new communication method enabling you to chat with your visitor through your Instant Messenger.

Even in office, most of us use Instant Messenger service to communicate with one another. As long as you have an account (GoogleTalk, Windows Live Messenger, Yahoo! Messenger, AIM, Jabber or ICQ), it can be linked to Plugoo. When visitors to your blog post messages on your Plugoo chat box, you will see the messages in real-time and are able to reply instantly. Your visitors do not need an Instant Messenger to chat with you, and will not know your Instant Messaging account address. The limitation however is that you can only chat with one person at a time.

For more ideas on what to put into your sidebar, check out Blog Widgets, Gadgets and Add-ons (I) and (II).

Blog Widgets, Gadgets and Add-ons (II)

This is a continued list of Blog Widgets, Gadgets and Add-ons which you can include into your Blog. If you have not read the first part, please check out Blog Widgets, Gadgets and Add-ons (I). You may also consider having a chatbox, shoutbox or message board on your Blog. We ended with AuctionAds which can earn you some extra revenue. We begin this second part with a fun widget that you can have.

Punkymoods

“The heart has its reasons which reason knows nothing of.” ... Blaise Pascal

Blog Widgets, Gadgets and Add-ons

If you are writing an online diary about personal events, you may want to let your readers know at a glance your mood at the current moment. Punkymoods does just that. Get a free account and add their code to your Blog. Whenever your mood changes, login to their site and set the mood. The image or emoticon displayed on your Blog will be automatically changed to show your current mood.

ChipIn

Blog Widgets, Gadgets and Add-ons

Organizing a fund-raising event and want readers to contribute to the funds? ChipIn provides a widget which gives an up-to-date status and a secure means of collecting the funds.

Clustrmaps

Most of us would have used statcounters to keep track of the number of visitors to our sites. Numbers alone may be a little stale, and if you like something more graphic which shows the locations of your visitors, open a free account with Clustrmaps.

Blog Widgets, Gadgets and Add-ons

Go to Admin page and copy the HTML code into your Blog. Their service is free if you have not more than 2,500 visitors per day.

Answers.com

Blog Widgets, Gadgets and Add-ons

Do you always have to explain terms and jargons used on your site? Incorporate some free Answer tools like AnswerTips and AnswerBoxes from Answers.com for your visitors to obtain instant answers to key words and queries.

Blufr

Blog Widgets, Gadgets and Add-ons

Also powered by Answers.com is the widget by Blufr where viewers are posed a question which could either be true or a bluff. [Update: Service is no longer available and link is therefore removed.]

TheFreeDictionary

This site TheFreeDictionary has more free tools for you to choose from. You could have a simple dictionary lookup box.

Blog Widgets, Gadgets and Add-ons

You could also consider other useful resources like Word of the Day, Article of the Day, This day in history, Today's birthday, In the News, Quote of the Day and games like Spelling Bee, Match Up and Hangman.

Blog Widgets, Gadgets and Add-ons

LibraryThing

Blog Widgets, Gadgets and Add-ons

If you have a collection of books, you might find the service at LibraryThing useful. Here, you can create an online catalog of your books and be connected to people around the world who share similar collections. You can place a widget on your Blog to let people know what you are reading.

Vizu

Blog Widgets, Gadgets and Add-ons

Creating a blog poll to collect opinions from your readers has never been easier. With Vizu you can create a poll using customized templates and insert the polling widget into your Blog. If you'd like extra income, they will pay you to host selected webpolls through their Vizu Answers scheme.

WeLoveWidgets

Blog Widgets, Gadgets and Add-ons

Teaming up with Astrologer.com, WeLoveWidgets provides a horoscope widget that updates itself and lets you see who you are compatible with.

Technorati

Blog Widgets, Gadgets and Add-ons

This site was discussed in our article on Submit Blog to Blog Directories (I). Check out the blog widgets offered by Technorati too. You can have widgets displaying the top tags of your Blog and number of Links, or try their new Authority widget to show your status as an authoritative blogger. Again, this is based on the number of blogs linking to you.

© www.RiOtunes.blogspot.com

Blog Widgets, Gadgets and Add-ons (I)

In this series, we shall list the free, popular, and interesting web widgets and gadgets that you can consider adding to your Blog. Widgets are elements that extract the services or content from other sites. Some of these widgets are useful, providing your readers with news, information, and reference tips. Others may be just fun and games which make your Blog a little more interesting and promote interaction among your readers. Because there are so many applications, developers and sites, this article will be split into parts and we shall update them now and then.

Many of the sites offer easy to install HTML or JavaScript codes. All you need to do is to copy the code and place them into your layout. For instance, if you want a widget to appear in your sidebar, login to your Dashboard, go to Template -> Page Elements and click “Add a Page Element” at the sidebar. Select “HTML/JavaScript”. Paste the code generated by the service provider and save. Every time you create a new page element, it appears at the top of all the other elements. If you want it somewhere near the bottom of the sidebar, just left-click that “Page Element”, drag and drop to the place you want. Click “Save” at the top right hand corner of the page to save the new layout.

A note of caution when adding widgets. While you may be tempted to have as many widgets as you can lay your hands on, having too many may clutter the Blog and cause slower page downloads. Also, since many of them work on JavaScripts, readers who configure their Firefox or IE browsers to block scripts may not see these features. For these reasons, we have added only a couple of widgets to let you have an idea, but have not included all the widgets listed in this article. Take your time to pick those that truly complement your Blog contents.

Google Gadgets

Take a look at the directory of widgets at Google Gadgets and you will instantly know what widgets are all about.

Blog Widgets, Gadgets and Add-ons

Many of the applications are created by different developers and users. There is no registration required at your end. When you have chosen one, click “Add to your webpage” and you will be asked to customize the title, width, height and border of the gadget. If the width of your sidebar is e.g., 150 px, you may want to set the gadget width to something less than that. It is alright to have a larger width, but readers will have to scroll to view the gadget in its entirety. When you are satisfied, click “Get the Code”. Copy the code and paste it into your “Page Element” described above.

Widgetbox

If you think Google Gadgets are great, you would love the directory of web widgets at Widgetbox. They provide ready installation codes for TypePad, WordPress, Blogger, MySpace and most other blogs, sidebars or websites.

Blog Widgets, Gadgets and Add-ons

Register for a free account. Search for the widgets that you like. Determine the display settings and click “Get Widget”. You can either “Get Widget Code” and paste it into your Blog layout as described above, or let them do it for you by clicking “Add to Blogger”. We prefer the first method.

If you have several widgets, you can also “Make a New Panel” under “My Widgets” and add these widgets into your panel. The advantage is that when you “Install”, you will have one code generated for the panel rather than several codes.

Snipperoo

In a similar fashion, Snipperoo has a directory of widgets that you can use. You can pick several widgets, arrange them into a panel, and the site will generate one code for you to place on your Blog. We think that configuration was much easier previously. With their new interface and a scheme to pay you for putting the widgets in your Blog, we would rather stick with Widgetbox.

Blog Widgets, Gadgets and Add-ons

In any event, if you want to have a look, register for a free account. Once you are logged in, begin by creating a “New Panel”. To the left, you will see “Get Widgets”. Add the ones you like into your Panel. Drag and drop to arrange them in the desired positions. Click “Publish” to update and generate a code.

AddThis

This is a useful service. The widget allows readers to easily bookmark your Blog, or subscribe to your feeds. It supports many feed reader as well as social bookmarking services. The design looks neat and saves up a lot of space.

Register at their AddThis site. You can either have a Bookmarking widget

AddThis Social Bookmark Button

or Feed widget

AddThis Feed Button

If you are prompted to enter your Feed URL, you could use your Blog URL with “/atom.xml” or “/rss.xml” after it. In this Blog, you will see that the Bookmarking widget has been inserted into the template such that it automatically appears after every post. To do this, go to Template -> Edit HTML and click the “Expand Widget Templates” checkbox.

Blog Widgets, Gadgets and Add-ons

Next, look for this line: -
<div class='post-footer'>


Paste the generated Bookmarking widget code either just before or just after that. You can preview the Blog to see the difference in the position of the widget. Should you want the widget to appear on the left or right, you can align it by adding the following alignment tags to the widget code:-

<div align='right'>WIDGET CODE</div>


Lilypie

If you have a baby, child, or are expecting one, the tickers you find at Lilypie will be nice inclusions in your Blog.

Blog Widgets, Gadgets and Add-ons

You don't need to register to use the service. Simply choose the background, select marker and input personalized text to create a ticker code. Paste the HTML code into your Page Element.

TickerFactory

This is another tracker that you can add to your Blog. Visit their TickerFactory site and choose something that you would like to track. The popular ones are weight loss progress, baby's age and anniversary countdowns. No registration is required.

Blog Widgets, Gadgets and Add-ons

Customize the ruler and ticker slider designs, copy the HTML code and paste it into your Page Element.


8/21/2011

50 Great Widgets For Your Blog

 50 Great Widgets For Your Blog


 Widgets are a handy, easy and simple way to add some flare to your blog. Whether you’d like to display the number of currently online visitors to your site or simply the weather report for Los Angeles, you can do it with widgets. We’ve assembled a list of 50 useful or simply cool widgets for your pleasure. And remember, the first rule of widgetizing your blog is – don’t overdo it!

MyBlogLog’s Recent Readers – 
this widget can easily be called a hit amongst blog owners; its popularity even managed to convince Yahoo into buying MyBlogLog. The widget lets you see the avatars of recent visitors to your blog, provided they’re also members of MyBlogLog.

Mashable –
get the latest social networking news from this very site.

Flickr Flash Photo Stream Badge –
display images from your Flickr profile with a handy Flash photo stream.

Preview Anywhere –
see a live preview of outgoing links in a small popup which activates on mouseover. Some find this annoying, while others might find it useful.

Twitter Badge –
if your life is so interesting that everyone must know what you’re up to all the time, then a Twitter badge is the ideal counterpart to your blog. It’ll proudly displays your recent tweets.

Digg News –
display the latest Digg links on your blog. Themeable and fully customizable.

FEEDJIT –
real time traffic data directly in your blog’s sidebar.

LineBuzz –
inline comments for your blog. Very handy for blogs with frequent lively discussions.

Flixn
display a stream directly from your webcam, so your blog visitors can always see what you’re up to.

3Jam –
lets your visitors send messages to your mobile phone, without them knowing your phone number.

Jaxtr –
with Jaxtr, your visitors can actually call you to your mobile phone; again, your number stays private.

LinkedInABox – show off your LinkedIn profile. Perfect for personal blogs.

Box Widget – enable visitors to use box.net’s online storage directly on your web site.

Price of gas – displaying gas prices on your blog might seem unnecessary to some, but it’s cool if you have a traffic/travel related blog.

iBegin Weather Widget – Display weather information in your sidebar. Just like with Price of Gas, works great with travel-related blogs.

ClockLink – display time in various time zones with these nifty Flash clocks.

Film Loops –
display the latest loops from your FilmLoops account.

Daily Painters –
display paintings from famous painters on your blog.

WhoLinked –
show your visitors which sites have recently linked to your web site. Works with all major blog platforms.

Criteo AutoRoll –
displays links to blogs similar to your blog.

Bitty Browser –
embed a cute, fully functional mini web browser to your blog.

Leafletter –
create a mini website and embed it into your blog.

WikiSeek –
search Wikipedia with this simple widget.

FeedCount –
show off the number of visitors to your blog with this handy little button.

Technorati Link Count –
display the number of links your website has from one of the biggest blog authorities – Technorati.

MyPageRank –
another good way to show how “big” your blog is is to show off your Google PageRank.

CheckPageRank –
  in addition to showing your PageRank, this widget also shows your Alexa ranking.

BlinkxIt –
embed a link to related videos directly into your website.

Skype button –
display your Skype online/offline status on your blog.

RockYou Horoscope –
not something I would personally use, but some people are into horoscope. Hell, most people are into horoscope. Anyway, this widget shows horoscope (doh!) and does it in a nicely designed colorful box.

del.icio.us Tagometer –
display how many times have del.icio.us users saved your page

del.icio.us Linkrolls –

this badge shows your latest bookmarks from del.icio.us.

Timelines –
need to create a timeline? Seek no further. This widget makes it really easy.

PollDaddy –
PollDaddy lets you create beautiful polls in no time, and display them at your blog.

Vizu –
another poll-making widget, compatible with all major blog platforms.

AnswerTips –
display definitions from Answers.com for various terms on your blog. The definitions are shown in bubbles which are activated on doubleclick.

AnswerBoxes –
give your visitors a chance to enter a term themselves, and get a definition from Answers.com

Now Playing –
if you got to share your current playlist contents with the world, Sigamp will do the trick. Works with most popular music players, including Foobar, Winamp, iTunes and others.

BuzzBoost –
display headlines from your RSS feed on any website.

LibraryThing –
show off the latest books you’ve been reading.

Plaxo Address Book –
let your most faithful visitors access their address books direclty from your site.
 AuctionAds – a widget that displays auctioned items on eBay, and gives you a percentage of the price paid when sometimes buys an item.

aStore – similar to AuctionAds, only for Amazon. Create a mini-store on your site and receive profit when someone buys an item through your store

Plazes –
show your current location on a Plazes map.

Stockalicious –
track your portfolio with this widget, and share it with others. Let everyone know how much money you’ve lost.

Yahoo! For Good –
create a charity badge and ask for donations for a worthy cause.

Giftspace –
  your friends never know what to buy you for birthday? Let them know what you really want with this nifty widget.

MixMap – 
see where are the visitors to your MySpace profile from on a map.

 Google Map Widget –
display a searchable Google Map on your website.

Google Video Search –
add a video search form and selected videos to your web site.

Odeo player –
display an Odeo player for and podcast right there in your sidebar.


This Article Collected From....[www.mashable.com]


www.mashable.com

free counters

Submit ExpressSEO Services & Tools